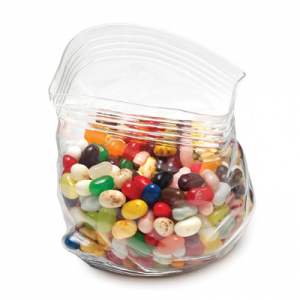
Ziploc - Easy way for Toy Storage Toys, toys and toys, everywhere, if you have toddlers, and young children...you may have taught them the 'Clean up-Pick up' mantra, yet kids are kids. How much you resist buying new toys, you end up surprising your child with a new toy, every fortnight just to see them smile and to please them. Storing toys away after play time is a big task and needs lots of space and containers too. For people who like organising, shoving the toys into designated boxes or bags is a better idea. Though the child is least interested in picking up all his/her toys, they will observe and learn. How many boxes will you put them in....one day the whole nursery will be full of boxes....i prefer storing small toys, puzzles, small story books, snacks, sticker cards, sometimes cs filled with milk to avoid minor spills in Ziploc or any other Easy Seal reusable bags. Ziploc kind of bags have become extremely famous in any kitchen space...keep a box pf these handy for any storage organisation DIY project...you can categorise the toys and seal them all away in separate ziploc bags. That way, they will not be lost so easily. Taking a single play set for travel times will be so easy too. Boxes are heavy and occupy space, whereas these Ziploc bags keep items together and sealed, they are light weight bags and occupy only the item space. You can take these Ziploc toy bags for car trip, long or short flight journeys in carry-on baggages, to the Doctor's office inorder to keep the child occupied while waiting and during consultation. These bags fit well and easily in ordinary size of handbags too.....infact, everytime you have to carry any item from home, just think of these Ziploc bags, i am talking about ordinary transparent resealable, reusable plastic bags. They are an excellent source of storage. - Prathyusha Talluri
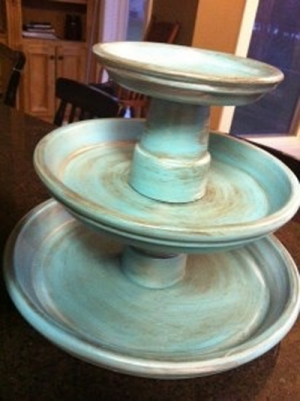
Buy Tiered Stands or DIY Space organisation and Decorating go hand in hand. Here are some ideas to either buy and make tiered stands for use in kitchen, pantry, closet, bathrooms, nursery, beauty salon, makeup desk, craft room, sun room for small plant pots, etc and etc.......even at your office. I personally used my only tiered stand for fruits, a year, then my makeup stuff the second year, then, its in my kitchen holding me spice jars this year. Tiered stands are the trend now, if you dont have one at home, then you are not modern ! You can find these at any home store, or if you have a DIY hand, then get some beautiful unbreakable dinner plates or dishes, some candle holders, the strongest glue, or even some tin cookie boxes for the tiers, or some tin cans, narrow-thin flower vases and wine glasses for the stand. Using the glue, tier up your favorite stand. you can also think of these as gifts, as hostess gifts. Get started, this tiered stand organiser will deck up your ANY space. - Prathyusha Talluri
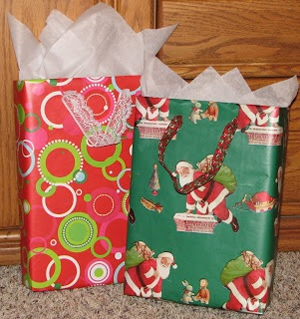
Cereal Box Crafts Cereal boxes are not so easily biodegradable, they take more time to degenerate compared to just brown paper hence reusing them is better. Their hard cover makes it convenient to think of craft ideas. Some very creative minds have given their crafty ideas life and reused cereal boxes to make cabinet and desk dividers, some made file organisers, both vertical and shelved horizontal. Some cereal boxes come so sturdy like the 'Cascadian Farms Organic Granola Cereal' box, that a DIY Crafter can't resist the urge to make a new item out of it. I am personally collecting a few of those boxes for my next project. The not-so sturdy cereal boxes can also be used to make gift bags, if wrapped and pasted on with colorful,printed paper and ribbon handles punched for carrying. What a brilliant idea, i spent years heating my brain up when it was time to wrap gifts. I am amazed at the creativity of the people who made the items in the pictures here. Kudos to them!! Many other innovative, surprising ideas to turn those simple cereal boxes into a treasure are waiting to be posted in our next article, until then keep collecting those valuable cereal boxes and the DIY items for use!! - Prathyusha Talluri


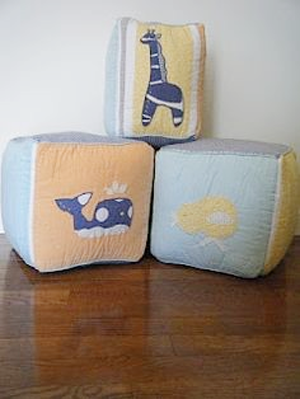
Crib Bumper Converted! Baby Cribs are becoming famous and useful in India too. They have been in use for decades in the Western countries...Bumpers were widely used to avoid the babies from bumping thier heads to the rails. However, Pediatricians now a days, dont recommend Bumpers due to Suffocation problems. It is said that Air circulation is restricted if bumpers are used, and quite few children are reported to have fainted in sleep due to suffocation. Bumpers are sold as part of a crib bedding set, and now they are of not much use in place. But smart Moms are converting bumpers as Wall storage options and Crib rail protectors when babies start teething and bite the top rails of the crib. Bumpers can be used outside the crib or through a staircase to avoid children from hitting while playing or running around. And they can also be cut up to make Bolster pillows or Soft cubes for play. Some cut up bumpers can be hung as Valances to the Nursery window. And when the child is using the crib as a day bed, that same bumper can be cut into two halves and tied as back rest. - Prathyusha Talluri

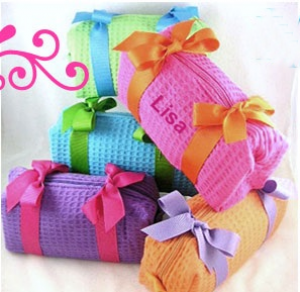
Innovative Wedding Return gift Ideas Return gifts or Party favors have become so much necessary...they have been a tradition in Indian celebrations from ages, however, typically, blouse pieces, ' Pasupu-Kumkuma' , fruits and flowers, some religious books were considered return gifts, but Modern life has changed things....along with the above things, a special item if included- is only considered as a return gift. Be it a wedding in any religion, a child's Birthday party, a Silver Jubilee wedding or a 60th Birthday, party favors are essential. We need not trouble our time or purchasing ability by buying the same items everyone does, there is always a chance to be creative. Think of party favors like small plants based on the climatic conditions, shawls or scarfs if its a cold region, small retractable umbrellas if its a rainy or hot region, eco-friendly reusable shopping bags or bamboo lunch boxes if you are an earth-friendly person and if you would like to spread good deeds, any handmade decorative items sold by an NGO or a social- upliftment group that you want to support, good self-help books on childcare, safe pregnancy and relative topics if it is for a BabyShower party based on the age groups and backgrounds of Ladies attending, Toy organisation Boxes, Bedtime story books that are helpful to parents and interesting to kids if its for a Birthday party, Medicine organisers, personal massagers, or Yoga mats if its for a Silver jubilee wedding anniversary or 60th birthday 'Super Annuation' party, vegetable choppers, or small home appliances if its a wedding.... . Party favors dont come so cheap, one has to spend a fair amount of money to buy a reliable piece...then why not invest in better, really useful ideas, so that people dont hand your party favors to someone else in another party.....i am against that silly act.....infact, its a good habit to tell someone how useful their Party favor/return gift was if you are sincerely using it...otherwise, you can stay silent if you didnt like it much. Party favors are your status symbols, so dont take them too easy!! - Prathyusha Talluri
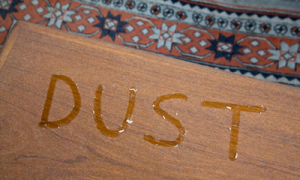
దుమ్ముతో జర భద్రం మన ఇంట్లో మనకి తెలియకుండా హాని చేసే ఎన్నో కాలుష్య కారకాలు ఉంటాయిట. యూస్ ఎన్విరాన్మెంటల్ ప్రొటెక్షన్ ఏజెన్సీ నివేదిక ప్రకారం సుమారు 12 రకాల హానికారక కెమికల్స్తో నిత్యం మనం సహజీవనం సాగిస్తుంటామట. బయటకంటే ఐదురెట్లు ఎక్కువ హానికర కెమికల్స్ మన ఇంట్లో వుంటాయంటే నమ్మగలరా? నిజమండి, సాధారణంగా మన ఇళ్ళకు తలుపులు వేస్తుంటాం. రకరకాల పొగలు, దుమ్ము, ధూళి వంటివి ఇంటి నాలుగు గోడల మధ్య తిరుగుతుంటాయి. నిజానికి అస్తమా వంటి ఎన్నో ఉపిరితిత్తుల సమస్యలకి ఈ ఇంటి లోపలి కాలుష్యమే కారణమట. ఇందుకు సంబంధించి నిపుణులు కొన్ని సూచనలు చేస్తున్నారు. సాధారణంగా హాలులో చెప్పుల రాక్ పెడుతుంటాం. మనం బయట నుంచి వచ్చి ఆ డస్ట్తో ఉన్న చెప్పులని ఆ రాక్లో పెడుతుంటాం. అందులో నుంచి హానికారక బ్యాక్టీరియా గాలిలో కలుస్తుంది. మన ఇంటి ఫ్లోర్, కర్పెట్లలో చేరి దాని ద్వారా మన శ్వాస నళాలలోకి చేరుతుందా బ్యాక్టీరియా. అందుకే చెప్పులని ఎప్పుడూ మన ఇంటి బయట వదలటం మంచిదిట. అలాగే ఎక్కువ చెప్పుల జతలు వాడే అలవాటు ఉన్నవాళ్ళ వాటిని బాక్సులలో భద్రపరచటం కూడా అవసరం. ఇక ఈ రోజుల్లో డ్రై క్లీనింగ్కి బట్టలు ఇవ్వటం సర్వసాధారణమైపోయింది. అయితే డ్రై క్లీనింగ్ నుంచి రాగానే బట్టలని వెంటనే వాడకుండా కొన్ని రోజులు ఆగటం మంచిది అంటున్నారు నిపుణులు. డ్రై క్లీనింగ్ నుంచి వచ్చిన బట్టల్లో కొన్ని హానికర కెమికల్స్ వుంటాయిట. అవి క్యాన్సర్, న్యూరలాజికల్ సమస్యలకి కారణమవుతాయిట. అందుకే అది పూర్తిగా డ్రై అయ్యాక వాడటం మంచిది అంటున్నారు నిపుణులు. ఇక ఇంట్లో సువాసన కోసం అంటూ కొన్ని ఎయిర్ ఫ్రెష్నర్స్ వాడుతుంటాం. కానీ కొందరిలో అవి ఎలర్జీకి కారణం అవుతాయి అని హెచ్చరిస్తున్నారు నిపుణులు. కాబట్టి సహజంగా సువాసన వెదజల్లే పువ్వుల వంటివి వాడటం మంచిదని కూడా సూచిస్తున్నారు వీరు. ఇంట్లో దుమ్ము, ధూళి పేరుకుపోవటం ఆరోగ్యానికి మంచిది కాదు అని తెలుసు. కానీ వాటిని క్లీన్ చేసే సమయంలో తగిన జాగ్రత్తలు తీసుకోకపోతే అవి మరింత హాని కలిగించే అవకాశం వుంది. దుమ్ము బాగా పేరుకుపోయిన చోట పొడి బట్టలతో తుడవటం వల్ల ఆ దుమ్ము మనం పీల్చే గాలిలో చేరుతుంది. అలా కాక తడిబట్టతో తుడిచి నీళ్ళల్లో ఆ బట్టని ముంచటం ద్వారా దుమ్ము పైకి లేవకుండా చూడవచ్చు. అలాగే ఇంట్లో బూజులు, దుమ్ము, ధూళి దులిపే సమయంలో ఇంటి కిటికీలు, తలుపులు వంటివి తీసిపెట్టాలి. లేకుంటే మనం దులిపే దుమ్ముని పీల్చి ఇబ్బందిపడతాం. వ్యాక్యూమ్ క్లీనర్స్ వంటివి వాడినా వాటిని కూడా ఎప్పటికప్పుడు క్లీన్గా ఉంచుకోవటం ఎంతో అవసరం. లేకపోతే అవి చేసే సాయం కన్నా హానే ఎక్కువగా ఉంటుంది. ఇల్లు తుడవటానికి ఉపయోగించే చీపురు, బట్ట వంటి వాటిని కాస్త ఎండ తగిలే చోట పెట్టడం ద్వారా బ్యాక్టీరియా నుంచి రక్షణ పొందవచ్చు. మన ఇల్లు భధ్రంగా ఉందనే నమ్మకంతో ఉంటాం మనం. కానీ పైన తిరిగే ఫ్యాన్ రెక్కలకి ఉండే దుమ్ము, కిటికీ ఊచలకి పట్టివుండే దుమ్ము, మన కాళ్ళ క్రింది మ్యాట్ ఇలా ఎన్నో మనం చూసీ చూడనట్టు వదిలేసే ప్రాంతాలలో చేరే హానికారక బ్యాక్టీరియా మన ఊపిరితిత్తుల ఆరోగ్యాన్ని నెమ్మది నెమ్మదిగా దెబ్బతీస్తుందిట. నా ఇల్లు రక్షణ కవచంలా ఉంది అని గర్వంగా చెప్పుకునేలా ఇంలాటి విషయంలో కొన్ని జాగ్రత్తలు తీసుకుతీరాలి. ఇంట్లో అందరి ఆరోగ్యం ఈ చిన్న విషయం పై ఆధారపడి వుంటుందని మర్చిపోవద్దు. -రమ ఇరగవరపు
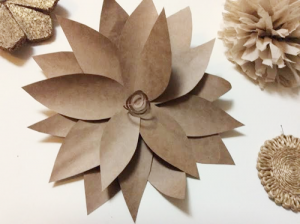
Brown Paper Bag flowers Repurposed ANYTHING to decorate a house or for Storage and Organisation is a better thought to reduce the making of new items and also to reduce the harmful exposure to environment. Brown paper bags have become purposefully famous these days. They have also been popular with the earth-friendly people and societies, Specially paper bags that have been made from trees of the sustainable forests, by planting a tree on cutting a tree. Paper bags made from used newspapers can also be utilised as shopping bags, lunch bags, sometimes dry trash bags, ....here we are using brown paper shopping bags to make simple large flowers for wall decoration. You may already have enough bags at home, or you need to wait until you collect sufficient number of bags.....a medium size shopping bag, ( i have used Trader Joes brown paper bags) , makes 2 large flowers or more if flower size reduces. Marking the petals: On the printed side of the brown paper bag, with a light pencil, mark each petal of the flower in basic shape. The bottom layer petals will be larger in size, for a 3 -layer flower. And so total number of petals can be between 12-13. Top layer has 3-4 smaller petals, middle layer has double the number, the bottom layer has triple the number of the top layer. Glueing Together: Once you finish cutting the marked petals, you can slightly fold each petal vertically to create a 3D effect, or even draw more details using a brown marker. Now, with the top layer, start glueing the petals together..., for the middle layer, insert a petal between every two petals of the top layer and glue them together. Similarly for the bottom layer. Make a small ball with the scrap brown paper and glue to the center of the flower as a bud. Glue each flower to a small cardboard piece for strength. Let all the glued pieces dry completely. You can even With a florist wire, make a small hook by inserting through a small hole to the cardboard piece. It is now ready for hanging. I just ddnt want to trash my treasured brown paper bags, though they were piling up, so i came up with this idea.....people have been asking me..its so easy to teach others too !! - Prathyusha Talluri

నిజాన్ని ఒప్పుకుంది పురుష ప్రపంచం ఇంటి వ్యవహారాల్లో ఆడవారే బెస్ట్ అంటూ మగవారు ఏకగ్రీవంగా ఒప్పేసుకున్నారు. ఇంటి బయట వృత్తి, వ్యాపారాల్లో ఎన్నింటినో సమర్థించే తమకి ఇంటి వ్యవహారాలు మాత్రం కష్టమే అంటున్నారు మగ మహారాజులు. అంతేకాదు... ఆర్థిక అంశాలలో కూడా తమకంటే తమ భార్యలే సరైన నిర్ణయాలు తీసుకోగలరని కూడా వీరి నమ్మకం. ఇలా ఒకటి కాదండి.. ‘‘ఆడవారి నిర్ణయాలు కరెక్టుగా వుంటాయి’’ అంటూ మగవారు ముక్తకంఠంతో తేల్చేశారు. వాళ్లు ఈ నిజాన్ని ఓ అమెరికా విశ్వవిద్యాలయం నిర్వహించిన పరిశోధనలో ఒప్పుకున్నారు. అమెరికాలోని అయోవా రాష్ట్ర విశ్వవిద్యాలయం పరిశోధకులు ఒక అధ్యయనంలో భాగంగా కొన్ని జంటల జీవన పరిశీలించారు. అలాగే వారిని కొన్ని ప్రశ్నలు అడిగారు. పెళ్ళయి సగటున ఏడేళ్ళకు పైగా గడచిన జంటల్ని ఇందుకు ఎంచుకున్నారు. ఆ జంటల వైవాహిక జీవితంలోని వివిధ సమస్యలు, వాటిని పరిష్కరించిన విధానం, వివిధ సందర్భాలలో వారి నిర్ణయాలు, వాటి ఫలితాలు వీటన్నిటినీ విశ్లేషించారు. ఆ జంటలకి కొన్ని సమస్యలు ఇచ్చి భార్యాభర్తలు స్పందించే విధానాన్ని రికార్డు చేశారు. వివాహ బంధంలో సంతృప్తిపై, నిర్ణయాలు తీసుకునే అంశంపై విడివిడిగా కొన్ని ప్రశ్నలిచ్చి జవాబులు రాబట్టారు. అలాగే వారి బంధంలో తలెత్తిన ఏదైనా ఒక సమస్యను చెప్పమని, ఆ తర్వాత అదే అంశంపై ఆయా జంటల మధ్య 10 నిమిషాలపాటు చర్చలు ఏర్పాటు చేశారు. ఈ క్రమంలో భర్తలు అందరూ ఇంచుమించు ఒకే అభిప్రాయాన్ని వ్యక్తం చేశారుట. తమకంటే తమ భార్యలు తీసుకునే నిర్ణయాలే మంచివని, అలాగే సమస్యలు వచ్చినప్పుడు తమ భార్యలే ధైర్యంగా నిలబడగలరని చెప్పారుట. అంతేకాదు.. ఇంటికి సంబంధించిన ఎన్నో విషయాలో తమకు అసలు ఏమాత్రం అనుభవం లేదని కూడా ఒప్పుకున్నారుట. వివిధ స్థాయుల్లో భార్యాభర్తల స్పందన తీరుని గమనించినప్పుడు ఇల్లు, కుటుంబ సభ్యులు, వారిపట్ల బాధ్యతల విషయంలో మగవారికన్నా ఆడవారే త్వరగా స్పందించగలుగుతున్నారని తెల్సిందిట. అంతేకాదు.. కేవలం ఇంటి ఇల్లాలిగానే కాకుండా తను నిర్వహించే ఏ బాధ్యతలనైనా అంతే శ్రద్ధతో, అంకితభావంతో నిర్వహించడానికే ఆడవారు ఇష్టపడతారని కూడా వీరి అధ్యయనంలో తేలిందిట. మరో ముఖ్యవిషయం... చాలామంది మగవారు ‘‘భార్య చెప్పినట్టు వినటానికే’’ ఇష్టపడతారుట. ఆమె నిర్ణయాలు సరైనవని నమ్ముతారుట. కానీ, ఆ విషయాన్ని బయటకి చెప్పటానికి మాత్రం జంకుతారని తేలింది. మొత్తానికి భార్య తనకంటే తెలివైన నిర్ణయాలు తీసుకోగలదని నమ్మినా ఆ విషయాన్ని బయటకు చెప్పకుండా జాగ్రత్తపడతారుట మగవారు. మగవారితో వచ్చిన చిక్కు ఇదేమరి! -రమ ఇరగవరపు
_large.png)
A Die Hard Traveller.. . "If u treat your life as a present life will give you chances to celebrate everyday"~ Neelima Reddy Alla I met her through her pictures on FB, each picture offers a glimpse in to her ever enriching life.She lives out of her backpack, visited 11 countries and trekked the Himalayas!!!!!! Meet Neelima Reddy Alla, a software Engineer by profession and a die hard traveller!!!! A rather unusual profile given her back ground. She hails Kavali a city in Nellore district in Andhra Pradesh. ( in India when you tell me where you are from, I tell you what you should and should not be doing with your life). To me she is a self-made woman who knows what she wants out of life and also knows exactly how to get it. when I met her recently in Hyderabad here is what she told me " if I decide to quit my job today and spend my life traveling , I would not have to worry where the money would come from". No she has not inherited riches, and not because she is married rich either. She started planning for this years back and " the plan has worked" and has secured her future. She is the most positive and motivated person I have met, a fun loving, hardworking fitness geek. Staying happy and enriching others through her experiences is her motto. So what does it take to live a life that you love? I bet it is just that, a love for life!! Lean-in India is proud of you Neelima, thank you for "leaning -in" for your self . You definitely are a inspiration! Good luck as you take off to explore three more countries next month!!! Does that make it 14 countries ..... Oh well who is counting anyway ! - Jayasree
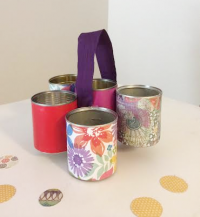
Reused Tin Utility Caddy Reusing is the Mantra, even with decorations and crafts. For this new item we are making, firstly we need is to patiently collect varied sizes of small canned food containers. It might take few months or based on your usage, just a day to collect the numbers. We begin like this---- Wash the tins well, once the labels are wet, peel them perfectly and let dry. Take the colorful printed papers of your choice, measure them to cover each can, cut them to size. Apply Mod podge generously to the first can, start sticking the paper to it without creases. Follow the same step for all the cans. Take the first can and give a light coating of mod podge over the paper for water proof and shiny finish. Follow the same for other cans. At this step, you have to decide which can is your centre piece that supports the other cans, the tallest or the biggest the better. With the help of hot glue gun, or florist wire, attach each tin to the center tin. Using the hot glue, create a handle with a sturdy ribbon. Voila!! Your new utility caddy is ready! Use it for school supplies, craft items, kitchen cutlery, sewing materials or even in the bathroom. It is great as a gift too , i gave it to a friend as Hostess gift and she loved it!! Warning: Be careful with the metal lining at the rim, while you are making this caddy or using it, it might cut your hand sharply. -prathyusha
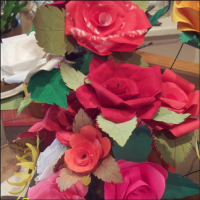
Starched Paper Flowers The paper flowers we are about to learn about can be made by people of any age group, starting with a preschooler. And with items available at home mostly, its easy to fill the blank walls in an innovative way. We need, cupcake liners or paper coffee filters, or even few not-so-thick ordinary white papers, Pair of scissors, Starch spray, A steel or plastic cup as mould, Acrylic colors and paint brush, Small sheet of cardboard, Strong glue and double sided tape. First, we have to cut the paper in desired shapes, then start painting them in desired colors and designs ( one idea is to dilute the color more so that it spreads and the flower looks filled ). Then place the painted flowers upside down on an inverted steel or plastic cup ( this makes a flower mould ). After you place the flower on the cup, spray starch ( if you dont have spray, sprinkle dissolved starch generously ) on the flower. Let it dry completely. You can gently peel the flower off the cup so that the flower shape stays intact. Get all the flowers ready, glue the bottom of each flower to a small piece of cardboard. Then stick a small piece of double sided tape to each cardboard piece, so that they can be stuck to the wall or any other medium. These flowers can be made easily by preschoolers too. And tell me if people dont ask you or get surprised if your child has made one!!
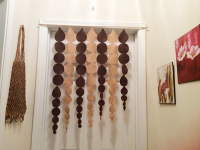
Felt decorates the doors f an entrance door or any other door in our houses look boring and blank, we dont have to run to the store to buy any decorations. Instead making one statement piece ourselves gives us that pride ! I was staring at a boring white door right opposite our entrance, almost everytime i enter my home. Though it took sometime to come up with this idea, i feel better now. All i needed was some ideas, very few materials, quite some patience and hours of handy time to stitch this piece. Items needed: Felt material in the colors desired Pair of sharp scissors Needle and suitable thread in the same color as the felt material A sewing machine or A glue gun A marking chalk Transparent embroidery wire if using the glue gun Mark the desired shapes on the reverse side of the felt material and start cutting them into pieces. Once all the pieces are ready, arrange them in the order desired. With a marking chalk or a dark pencil, on the reverse side, mark a center line with dots or dashes before sewing. If you are using a sewing machine: Carefully, sew the pieces in order along the marked line. With the help of needle and thread, make a strong loop at the top of each line for hanging. If not using a sewing machine: with a needle and thread, start sewing along the dotted line, not so visible on the front side. After stitching them together, take the embroidery wire and start as a loop to hang each piece by glueing along the dotted line with the help of a glue gun...this step is just to make it stronger. ( as shown in the picture). You can avoid the above step, if you think your hanging piece will be safe from children. Your door hanging is ready. I have a curious toddler, and so i had to keep the length not-so-long.....you can make it a door or window curtain, if you have the patience to cut so many pieces. Note: the pieces need not be in varied diameters. You can simply cut all of them in the same shapes and sizes to make things easier and faster. -prathyusha
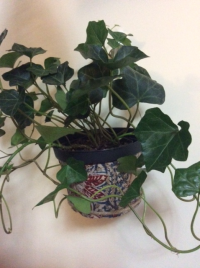
Reinvent the hanging pots Indoor plants look wonderful and make spaces look lively. Sametime with the concrete jungle growing larger, we have to think of indoor plants to improve greenery in small spaces and also to purify the air. But how many side tables can i fill with plants when a curious toddler is around and how many ceiling hooks can we drill with the fear of something falling on you if not fixed well !! And so i decided to hang the pots using Command Hooks. They are the best, as they can be removed if you are moving or relocating the plant, without damaging the wall, and they can also handle quite a weight. I didn't want to hang an ordinary plastic pot ( a slightly bigger size than the actual pot you have the plant in ), so i used Mod Podge and some fabric to decorate the plastic pot. And when that was dry, with the help of a strong wire, i fixed it a handle. The plastic i used is so soft, i was able to pierce the wire and tie a knot. But if you are using a hard plastic, then you might have to tie a handle in a way it wraps around without slipping off. And soon as the Command Hook was ready to use, i simply hung the pot and inserted the smaller size actual plant pot. I can now remove the smaller pot to water it or keep in it the sun, if necessary. This arrangement can be best used for creepers as they will hang and spread like a wine. Note: Please make sure to read the instructions provided on the pack if you are also using a Command Hook. -prathyusha
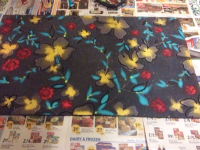
DoorMat Re-entry ! Aren't beautiful door mats so welcoming. I love those houses which showcase wonderful and interesting door mats. The owners might be unknown yet, those doormats attract our attention so much that we dont mind staring at the house and thinking of how artistic the people are, for a moment. In hunt of a pretty bright door mat during a boring season, i ended up bringing home a sober colored door mat, which i didn't mind displaying because of its simplicity. After lying there for a while, it shouted for color. I am definitely not thinking of another one, so i bought some bright acrylic colors and painted it. There it is!! My neighbors were surprised as they see this beautiful piece greeting them, every morning. I used... My current door mat, An old tooth brush to clean the mat (I Pressure Washed it under a shower. As it is made of recycled tires, it dried quickly. ( you can brush the surface clean if washing and drying is not easy). Acrylic or Oil colors of your choice. Painting brushes of suitable size. Old papers for underlay. - pratyusha

ఈ అయిదు.. ఆ మూడు రోజుల కోసం పిరియడ్స్ సమయంలో విపరీతమైన చికాకు, నీరసం, కడుపునొప్పి, తలనొప్పి వంటివి సాధారణం. అయితే మనం తీసుకునే ఆహారంలో కొన్నిటిని చేర్చడం ద్వారా ఆ ఇబ్బందుల నుంచి తప్పించుకోవచ్చుట. అవి ఏంటంటే.... 1. నీరు బాగా తాగాలి శరీరం ఫ్లూయిడ్స్ని కోల్పోతుంది కాబట్టి తగినంత నీరు శరీరానికి అందేలా చూసుకోవాలి. కాబట్టి మిగతా రోజుల కన్నా పిరియడ్స్ రోజులలో మంచినీరు కాస్త ఎక్కువగా తగాలి. కాఫీ, టీలని దూరంగా పెట్టడం మంచిది. 2. ఆకు కూరలు ఆకు కూరలలో కావలసినంత ఐరన్ వుంటుంది. పిరియడ్స్ సమయంలో శరీరానికి అందాల్సిన పోషకాలని ఈ ఆకుకూరలు అందిస్తాయి. కాబట్టి ఆకు కూరలను ఆ మూడు రోజులూ తప్పనిసరంగా ఆహారంలో చేర్చండి. 3. అరటి పండు పిరియడ్స్ రోజులలో మూడు స్వింగ్స్ ఉంటాయన్న విషయం తెలిసిందేగా. వాటి నుంచి బయటపడటానికి అరటి పండు మంచి ఔషధం. పొటాషియం, బి6 విటమిన్తోపాటు అరటిపండులో వుండే ఇతర విటమిన్లు రక్తంలోని గ్లూకోజ్పై ప్రభావాన్ని చూపిస్తాయి. దాని వలన మూడ్ స్వింగ్స్ తగ్గి హుషారుగా వుంటారు. 4. లెగ్యూమ్స్ (గింజధాన్యాలు) చిక్కుడు కుటుంబానికి చెందిన బీన్స్ వంటి గింజ ధాన్యాలలో ఐరన్ శాతం ఎక్కువ. వాటిని ఆహారంలో చేర్చుకోవడం ద్వారా శారీరక సమతౌల్యం త్వరగా పొందచ్చు. 5. డార్క్ చాక్లెట్ డార్క్ చాక్లెట్లో వుండే మెగ్నీషియం వుండటమే కాకుండా, ఫీల్గుడ్ కెమికల్ అయిన సెరిటోటిని కూడా రిలీజ్ చేస్తుంది కాబట్టి పిరియడ్స్ సమయంలో ఓ చిన్న డార్క్ చాక్లెట్ తింటే చికాకు పోయి హాయిగా అనిపిస్తుంది. మొత్తానికి పిరియడ్స్ రోజులలో మెగ్నీషియం, ఐరన్, ఒమెగా-3 ఫ్యాటీ ఆసిడ్స్ కలిగిన ఆహారాన్ని తీసుకోవాలి. అంటే ఆకుకూరలు, చేపలు, నట్స్, బీన్స్, పప్పు ధాన్యాలు, పండ్లు వంటివి ఆహారంలో చేర్చడం ద్వారా ఆరోగ్యంగా వుండచ్చు. ముఖ్యంగా చదువుకునే పిల్లల ఆహారం విషయంలో అమ్మలు ఈ జాగ్రత్తలు తీసుకోవాలి. -రమ

Women, take time out for yourself too All you pretty ladies out there, when was the last time you took a short break from your work and paid some attention to yourself? When was the last time you met your girl gang and gossiped away over a cup of coffee? When did you last step into a beauty parlour to beautify yourself? When was your last shopping spree? When did you last catch up on your favorite actor’s movie? We agree that life is hectic and you’ve no time to spare for yourself! You’ve been racing against time to achieve the impossible task of managing your balancing act as well as you can. Taking care of the household chores, the needs of your husband and children, the health of your in-laws, and your own challenges at work – amidst all this, how can I set aside some time for myself, you may ask! But that’s where we step in with a few easy-to-manage options for you. Small things matter: Start with the smallest of things – like taking an extra 2 minutes to comb your hair rather than running your comb haphazardly, or sitting down for 3 minutes to sip your morning coffee at leisure rather than chopping veggies while gulping down the coffee in a hurry. For a change, make your favorite thing for breakfast and enjoy the aromas while you cook. Beauty bath: This is not something we recommend you do on a regular basis but you need to give yourself this treat at least once in a month. This is what women from across the generations have been doing – instead of soap, try this and notice the difference: Mix sesame oil or milk cream with a tsp of turmeric and 3 tbsps of besan, a few drops of water to make it into a not-so-thick paste, and rub it thoroughly onto your body. Leave it on for 5 minutes or till it becomes semi-dry. Now, rub off the paste residue from your body (you can use dry besan for the purpose if the paste is still wet in some places). Once done, have a bath using some besan instead of soap to remove excess oil. You’ll notice that your body feels fresh, gets back some of its glow (as you got rid of the dead cells while rubbing the paste off) while still retaining moisture. Your skin definitely feels softer and shinier. Try it and enjoy your new look. Pamper yourself: We know you don’t have time to spend a few hours in a beauty parlour. But this weekend, take at least a couple of hours off to pamper yourself in a minor way. Go to a parlour and check out what all you can get done in 2 hours. If they have any offers, better still! Otherwise choose individual things like eyebrows shaping, facial, haircut, manicure, pedicure, waxing… all these things can be done in a span of 2 hours. So, go ahead and beautify yourself and shine in that glory! Yoga & meditation: Or aerobics for that matter. Take up an exercise regimen and stick to the routine. Yoga and meditation are very good tools to relaxation – both physically and mentally. And we strongly believe that yoga and meditation bring out a natural glow on a person’s face. Shopping: Going on a shopping spree is the best form of entertainment. While at it, go as wild as you can get. Choose something that appeals to your eye, but this is something that you normally don’t wear – suppose you regularly wear saris, go ahead and buy that Anarkali salwar for a change, if you prefer salwars, then maybe it’s good to choose that chiffon sari you can’t take your eyes off! Or you can experiment a bit more and even pick up a jeans and a top, and see the surprise on your husband’s face! Entertainment evening: Dedicate an evening a month to catch up with your girl friends, or meet your colleagues outside office for a coffee. Talk about anything under the sun other than work! Nothing rejuvenates and relaxes you like an evening of gossip shared with close friends. Or if you’re the kind who likes to unwind inside a multiplex, go ahead watch your favorite actor’s latest release. We are sure there’s at least one movie in the theatres that might appeal to your taste. Whatever you do to unwind, do it to please yourself – because you deserve some time out and some pampering too!

Tips to buy new furniture Have you just moved into a new city for your first job? Or probably you’ve just taken up a new apartment on your own in a different part of the city. Or, have you got engaged recently and will be married in the next couple of months? Oh, so you purchased your brand new apartment in a plush gated community? Very well, indeed! We now understand why you’re looking at options to buy different pieces of furniture. Unlike our earlier generations, buying furniture has become an easy routine affair for us. All we need is a great idea and a minimum budget, and the choices are aplenty. But before buying any piece of furniture you need to keep in mind a few things. Do you already have some furniture at home? Are you planning to keep it or dispose it off and buy everything anew? Do you only want to add a few things and juxtapose them with your existing furniture? Which rooms in your house have an urgent requirement? Are there some pieces among your choices that can wait? If you enter a furniture showroom with these kind of questions in mind, you’ll be clearer about what to buy and how to go about it. That way, you won’t get tempted or influenced by the salesperson’s impressive words! Below are some of the aspects that you need to consider before buying anything. Lifestyle: What kind of a lifestyle do you lead right now? This is important especially if you’re single and you just need a couple of things to see you through before you contemplate marriage. Or, you’re also a workaholic and you spend most of your time, including weekends, at office. If this is the case, making choices would be easier as all you need are a mattress, a cot (optional), laptop/computer table and a few kitchen appliances. Budget: Money, and your budget, play a very vital role in choosing furniture. If you have a limited budget, then choose your pieces and items according to the need and urgency principle. What you can’t do without will have to be bought first. Rest of the stuff can wait. Don’t buy it all together and thereby avoid unnecessary accumulation of things. Colors: While a lot of us get instantly attracted towards brighter colors, think before you invest a hefty sum in that bright orange couch or red-and-gold sofa set. These might go well with the wall colors in your current home, but will they complement the set up equally well if you move to a different house where the furniture stands out? While it is okay to give in to temptation at times, buying something that you’ll regret selling later is not worth it. If you really want something in brighter color to light up your room, go in for a bean bag rather than a three-seater sofa set. Time: By time we mean the amount of time you intend to keep the furniture for. If it’s something that you really really love and want to keep it for the rest of your life, then think about aspects like durability, sturdiness and longevity. Each piece of furniture will have a life of its own. While wood has a longer life because of its sturdy nature, an upholstered piece may not survive the wear and tear for long. One also needs to keep in mind the amount of time one spends on that piece of furniture. If it’s a mattress or a couch, it needs to be strong and durable. If it’s a stand for a flower vase or a center/ side table, there’s no point in spending a bomb on those – fashion keeps changing and you can always keep up with latest trends by disposing off some of the older pieces and buying new ones. Own house or rented: This plays a very significant role in choosing your furniture. If you’re buying furniture for your rented house, then keep in mind the obligation of moving the furniture into your new apartment. Make sure your furniture is neither unwieldy nor incapable of handling the wear and tear with each move. Cheap or expensive?: Furniture should neither be too cheap nor too overly priced. While cheap furniture may not last long, expensive furniture may not fetch you good returns if you contemplate selling it off at a later stage. Choose something that is easy on your pocket but is trendy too! Second hand or first hand?: While it’s human nature to aspire to possess brand new stuff always, sometimes it might work out cheaper and better if you consider the option of seconds’ sale. Many websites like Quickr, Olx, Ebay and even some groups on social networking sites help you find second hand furniture in excellent to good condition for cheap. This concept might not go down well with us Indians but the idea of auctions and garage sales are very popular in the West. Sometimes you may end up hitting a jackpot or finding a treasured piece at throwaway prices. Don’t let go of chances like that. Period furniture: The concept of Period furniture or Antique furniture is picking up fast. There are a few stores in the city that sell period furniture (which is about 50-60 year old). Pick up a chest of drawers or the wooden book shelf or that comfortable solid teak cot for less than Rs. 15,000. These hand-me-down pieces not only last long but are also considered cool. Space, Comfort & Kid friendly: Keep in mind not just your comfort level but also make sure that your furniture is child-and-elderly-friendly. Ensure that there are no sharp edges anywhere when you buy something. Also keep in mind the space available around the furniture in each room. If you think something is too huge and unmanageable or if it occupies too much of a space in your room making your movement uncomfortable, then let go of it. It’s not worth the risk especially if you have elderly people or children at home. A minimum space-furniture ratio needs to be maintained to feel cosy – and not claustrophobic – in a room. Of haggling, Discounts, Festive offers: Last but not the least, never let go of a chance to haggle with the salesperson/shopkeeper. It’s our money so every rupee haggled is a rupee saved. If there is a discount offer, make sure you get maximum benefit out of it. We know of people who wait for the clearance sales and festive offers to invest in their favourite piece of furniture. Also, keep checking websites like Pepperfry, Urban Ladder, and Fab Furnish for their exclusive pieces of furniture and excellent bargains. Shanti Nanisetti